Home Is Where The Haggis Is

  • Home
  • About
  • Archives
  • Author Archives: Lisa Cavallari

    • Sydney’s Art Party

      Posted at 10:00 am by Lisa Cavallari
      Jul 22nd


      My oldest daughter is turning 6 today!  We celebrated her birthday last Saturday and the party theme she chose was arts and crafts.

      Art Party Sign

      I am not that adept (yet) at creating signs and printing them from my simple Epson printer so I just added some clip art, slapped the sign on a painter’s palette and used a giant pink clothes pin to keep it from blowing away from the front door.

      Art Party

      When the kids first came in we had a table set up to create sand art.

      IMG_3754

      Then the painting began.  Each child had his or her own canvas to paint.

      Art Party Decor

      I sewed crêpe paper streamers to a pretty ribbon to drape behind each chair.

      Tissue Pom Poms

      Tissue pom poms were hung from the ceiling.  Talk about easy to make!  The tutorial on YouTube was 4 minutes from start to finish.

      Art Party

      I found the plastic tablecloth  and little paint palettes from Oriental Trading Company.  There were markers on the table for the kids to fill in silly faces on some of picture frames, but they were so focused on the painting that they never made it that far.  I played it safe and used only washable tempera paint.

      Sydney's Birthday2 IMG_3776

      We used Hydrangea from our front yard to give the kids some inspiration.

      Hydrangea

      The bottles of water were flavored strawberry, lemon-lime, blueberry and grape by Crayola.

      Art Party

      Art Party T-shirt

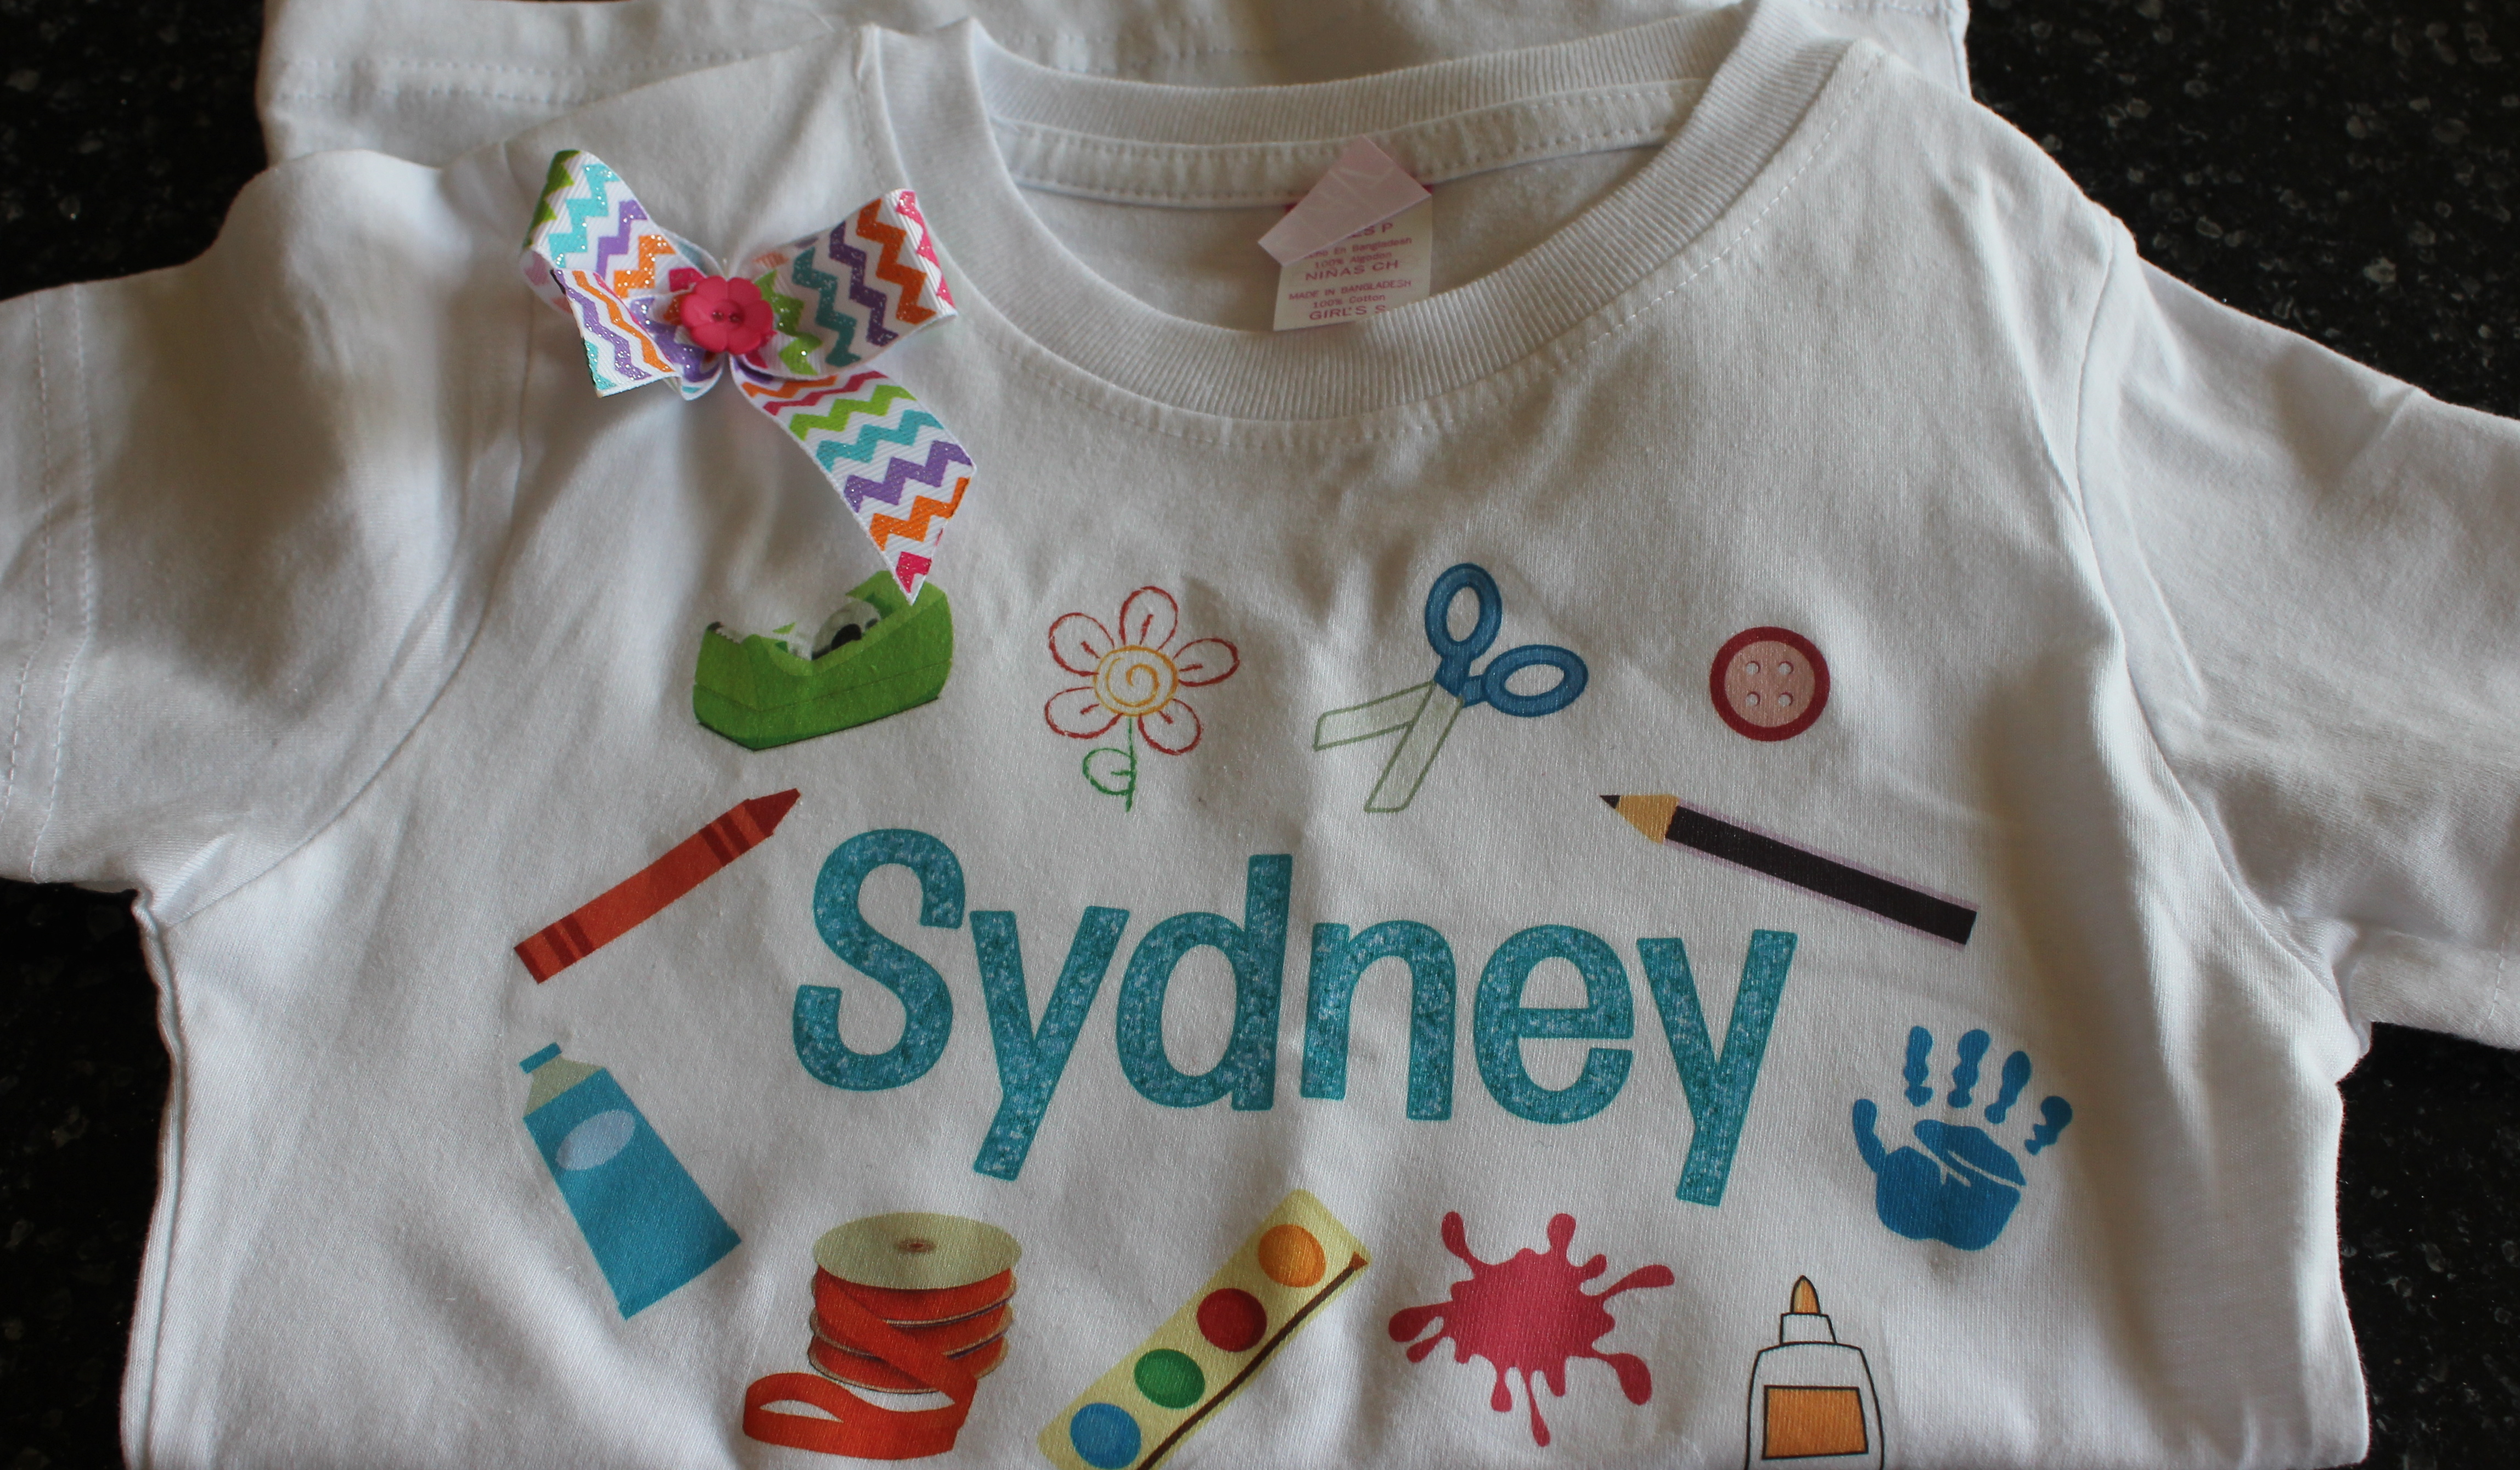
      While she painted, the birthday girl wore a new t-shirt designed by my friend who runs an adorable online store called Little Mac Boutique.  Check it out for your next birthday or special occasion.  She makes tutus, bows, leg warmers and more. Thank you Michelle!


      Art Party Dessert Table

      Art Party Dessert Table

      Here is the dessert table.  Sydney picked out a nail polish cake from Pinterest for me to bake.  I made the cake using 6 8-inch round cakes and topped it with 3 cupcakes (2 with their tops cut off) for the handle.  To keep the cake in place, I added three wooden skewers pressed into the middle and then placed the cupcake handle on top of them.  Refrigeration also firms up the cake and prevented it from sliding.

      I made the art studio sign from a large piece of plywood and painted it with chalkboard paint.

      Nail Polish Cake

      She looks intimidated here…and excited.  There are edible pink candies encircling the bottom and top.  This close-up reveals that this cake was definitely homemade.  Notice the slight lean to the left and not the smoothest job of frosting it, but hey, I made it and she loved it so that’s all that matters.

      Art Party Cake

      The inside of the cake.  I found a tie-dye boxed cake at the grocery store and grabbed three boxes.  This took some effort, but it was worth it.

      Art Party Cake

      Care for a slice?

      Art Party

      I used paint chip samples and stapled them to create utensil holders.

      Art Party Dessert Table

      More sweets.

      Art Party Paint Brush Treats

      Sugar overload.  But wait, can you see the rainbow fruit skewers just off to the right?  See? Healthy!

      As a memento, my friend Carrie suggested a larger canvas or poster board for the kids to draw on and express their birthday wishes.  It was cute and funny to see what they wrote and drew.

      Art Party


      After cake, it was time to burn off some energy so they went outside and I handed each party guest a can of silly string from the Dollar Store.  That was a hit, but there wasn’t much string in each can so a lot of them asked if I had anymore.  Luckily, the weather was beautiful so they enjoyed running around the backyard and playing on the play set.

      Art Party Favors

      As their take home gift, I found more goodies from OTC.  Artist palette lollipops, little notebooks, pencil sharpeners and behind the little notebooks is a small bag of Goldfish colored crackers.

      I am a HUGE believer in writing thank you notes.  If people are generous enough to take time from their busy schedules to celebrate with you, not to mention bring along a thoughtful gift, then it is important to show some gratitude and manners -in my humble opinion- by thanking them for it.  I found these paint-splashed notes at Target.

      IMG_3821

      This party took some planning, but it could not have gone more smoothly.  A big thanks to Rochelle and Glenda who stayed to help with the crafts and cleaning up.  I owe you.  🙂

      By the time the party was over, I couldn’t believe it was done.  I was definitely ready to sit and relax with a glass of wine.

      Happy Birthday Sydney!


      Share this:

      • Tweet
      • Share on Tumblr
      • Email a link to a friend (Opens in new window) Email
      • Print (Opens in new window) Print
      Like Loading...
      Posted in Baking, Kids, Shopping | Tagged Art Birthday Party, Art Party, Art Party Ideas, Arts and Crafts Party, Nail Polish Cake, Rainbow Cake
    • Perfect Pesto

      Posted at 10:00 am by Lisa Cavallari
      Jul 16th


      Pesto

      Here is summer in a jar folks.  It is packed with garlic and basil and the vibrant green color just makes me happy-not just because that happens to be my favorite color.  Mix up a batch and toss with pasta, spread on a sandwich or grab some crusty bread and dip right into it.  We buy our bread from Costco.  It’s their French Baguette that comes in a pack of 2 for $4.99.  (The pesto can also be shared among friends and neighbors.  You know who you are.) Pair it with a crisp white wine.

      Pesto

      Ingredients

      3 cloves of garlic

      3 cups packed basil

      1/4 cup pine nuts

      1 and 1/2 cups olive oil

      1 tsp salt and pepper

      1/2 cup grated Parmesan cheese

      Directions

      Place all ingredients into a blender and blend on high until completely combined.  Store in an airtight container up to a week in the refrigerator.


      Pesto

      Share this:

      • Tweet
      • Share on Tumblr
      • Email a link to a friend (Opens in new window) Email
      • Print (Opens in new window) Print
      Like Loading...
      Posted in Cooking | Tagged Basil, Garlic, Olive oil, Pesto
    • Fabulous Fireplace

      Posted at 9:00 am by Lisa Cavallari
      Jul 10th


      IMG_3734

      This post has been a long time coming and I am excited to share it with you.  Sometime back in January I happened upon a very cool idea for your fireplace when it’s not in use.  Pepper Design Blog had posted an interesting solution to recreate the look of faux stacked wood for her fireplace so I followed her instructions and gave it a shot.

      IMG_3373

      Let’s start off with the materials you will need.  A piece of plywood cut to fit the opening of your fireplace, chalkboard paint, lots of birch or any wood you care to use and wood glue.

      IMG_3370

      I had my husband measure and cut out the plywood for me.  He made sure the wood fit snugly into the opening before I began painting.

      The wood only needed one coat of paint and the chalkboard kind gives it a flat look instead of going glossy.  The idea is to give the effect of depth.

      Next I had my father-in-law and husband cut 3-inch pieces of birch for me.  This is the hard part because it takes a lot more wood than you would expect.  I thought I would have plenty with 13 large logs, but I needed waaay more than that, more like 4 times that many.

      My dad is the supplier of the birch.  He brings it home from his fishing trips in northern Minnesota and my mom will stock up her car when she drives out to visit me and the girls.  🙂  Aw, such a lucky daughter to have these kind of parents.  I am sharing this post in the summer because wood is much easier to get now then, oh, I don’t know the dead of winter when I decided this would be a great project to take on and there was no wood in sight.  I wasn’t kidding when I said this project took me a while.  I got my second round of birch in June and got back on track with this DIY job.

      Finish cutting the 3-inch pieces.  Hint: I went to Home Depot and they cut the rest of the logs for me at no cost.  Yay!  This was shaping up to be a very budget-friendly project indeed.

      The saw left behind some rough edges so I used a sander to smooth them down a bit.  The logs are not all perfectly smooth, but it gives them a more rustic look.  Or whatever I want to tell myself.  ; )

      The final step was arranging the log pieces the way I wanted on the plywood and gluing each piece down.  I used Gorilla Glue and loved the results.  At some point I might reinforce the bottom and side logs with a nail gun, but I don’t have access to one at the moment.

      Here is the completed project.

      IMG_3726 IMG_3727

      What do you think?  Ready to take this on too?


      Share this:

      • Tweet
      • Share on Tumblr
      • Email a link to a friend (Opens in new window) Email
      • Print (Opens in new window) Print
      Like Loading...
      Posted in diy | Tagged Faux Fireplace Insert, Faux Stacked Logs, Fireplace Insert, Stacked Birch Logs
    • Tomato Basil Soup

      Posted at 9:00 am by Lisa Cavallari
      Jul 5th

      Tomato Basil Soup

      Soup in the summer?  Yes!  This soup tastes great hot or cold.  In the summer or winter.  It is very versatile.  Top it with sour cream or a chiffonade of basil.  Serve with grilled cheese, mac n’ cheese or a simple salad, crusty bread and a glass of wine.

      Tomato Basil Soup

      Tomato Basil Soup 

      Ingredients

      3 pounds ripe plum tomatoes, cut in half lengthwise

      1/4 cup plus 2 Tbls olive oil

      1 Tbls salt

      1 and 1/2 tsp freshly ground pepper

      2 medium yellow onions, chopped

      6 cloves garlic, minced

      1/4 tsp red pepper flakes

      1 28-ounce canned crushed tomatoes

      2 cups basil leaves, packed

      4 cups chicken stock or water *

      • I use chicken stock in the winter to give the soup a heartier flavor.  In the summer, the water works well and makes the soup a bit lighter.

      Directions:

      Preheat oven to 400 degrees.  Toss together tomatoes, salt, pepper and 1/4 cup olive oil on a rectangular sheet pan.  Roast for 45 minutes.

      Roasted Tomatoes

      In a large pot over medium heat, sauté onions, garlic and red pepper flakes with remaining 2 Tbls olive oil and butter.  Cook for 10 minutes until onions start to brown.  Add crushed tomatoes from can, roasted tomatoes from pan (including juices from the pan), basil and water or chicken stock.  Bring to a boil and simmer for 45 minutes.  Use an immersion blender or, working in very small batches use a blender to blend the basil and tomatoes into the soup.  Caution!  Hot liquids can pop the top right off the blender and cause serious burns.

      Tomato Basil Soup

      Freeze some and use within 6 weeks.

      Enjoy!

      Share this:

      • Tweet
      • Share on Tumblr
      • Email a link to a friend (Opens in new window) Email
      • Print (Opens in new window) Print
      Like Loading...
      Posted in Cooking | Tagged Summer Soup, Tomato Basil Soup
    ← Older posts
    Newer posts →
    • Recent Posts

      • Know The Signs
      • Popovers
      • Wine On Wednesday: Pride
      • Chicken Piccata
      • Skillet Chocolate Chip Cookie
    • Categories

      • Wine (47)
      • Baking (41)
      • Cooking (31)
      • Holidays (16)
      • Kids (16)
      • Shopping (10)
      • diy (10)
      • Uncategorized (8)
      • Travel (7)
      • Health (5)

Start a Blog at WordPress.com.

  • Subscribe Subscribed
    • Home Is Where The Haggis Is
    • Join 82 other subscribers
    • Already have a WordPress.com account? Log in now.
    • Home Is Where The Haggis Is
    • Subscribe Subscribed
    • Sign up
    • Log in
    • Report this content
    • View site in Reader
    • Manage subscriptions
    • Collapse this bar
 

Loading Comments...
 

    %d