Home Is Where The Haggis Is

  • Home
  • About
  • Archives
  • Category: Baking

    • Strawberry Fruit Rollups

      Posted at 7:00 am by Lisa Cavallari
      Mar 12th

      IMG_4187

      My daughters love fruit rollups from the store.  Aside from the garish colors and blast of sugar, I am okay with buying them every now and then.  Then I saw a recipe on…Pinterest! (Where else?) I decided to give the homemade version a try.  My youngest assisted me in the kitchen and had fun making them, but when it came time to take a bite she hesitated.  I tried one and was surprised at how similar the taste was compared to the store bought version.  She proceeded with caution, took a smile bite and immediately spit it out.  Maybe it’s the seeds?  My oldest one was excited to try them when she got home from school and sadly, she gave it a thumbs down too.  I think they make a great portable snack.  In retrospect, I should have offered them after their evening swim lessons when they will eat anything. Oh well, I think they taste great so more for me.

      You could try this recipe with your kids and probably have better luck.  It’s simple to make.  Spring break isn’t far away and this would be a perfect way to sneak in some science.

      Recipe from Fifteen Spatulas

      Strawberry Fruit Rollups

      • Time: 4 hrs
      • Difficulty: easy
      • Print

      Ingredients

      8 ounces strawberries, stems removed
      1 Tbsp lemon juice
      3 Tbsp sugar

      Directions

      1. Place strawberries into a food processor or blender and puree until smooth.

      2. Transfer strawberry puree to a saucepan. Add lemon juice and sugar. Turn heat on stove to medium and cook for about 10 minutes until sauce begins to thicken.

      3. Preheat oven to 170 degrees. Line a rimmed baking sheet with parchment paper. Pour strawberry mixture over paper and use an offset spatula or knife to smooth out into a rectangular shape.

      4. Bake in the oven for about 3 1/2 to 4 hours. You want the middle to be slightly tacky, but you don’t want the entire rollup to be crisp and cracking. The sides might crack a little though and that’s fine.

      5. Remove fruit leather from oven and cool for about 10 minutes. Use a pizza cutter to cut strips and roll ’em up! Enjoy.

      IMG_4180
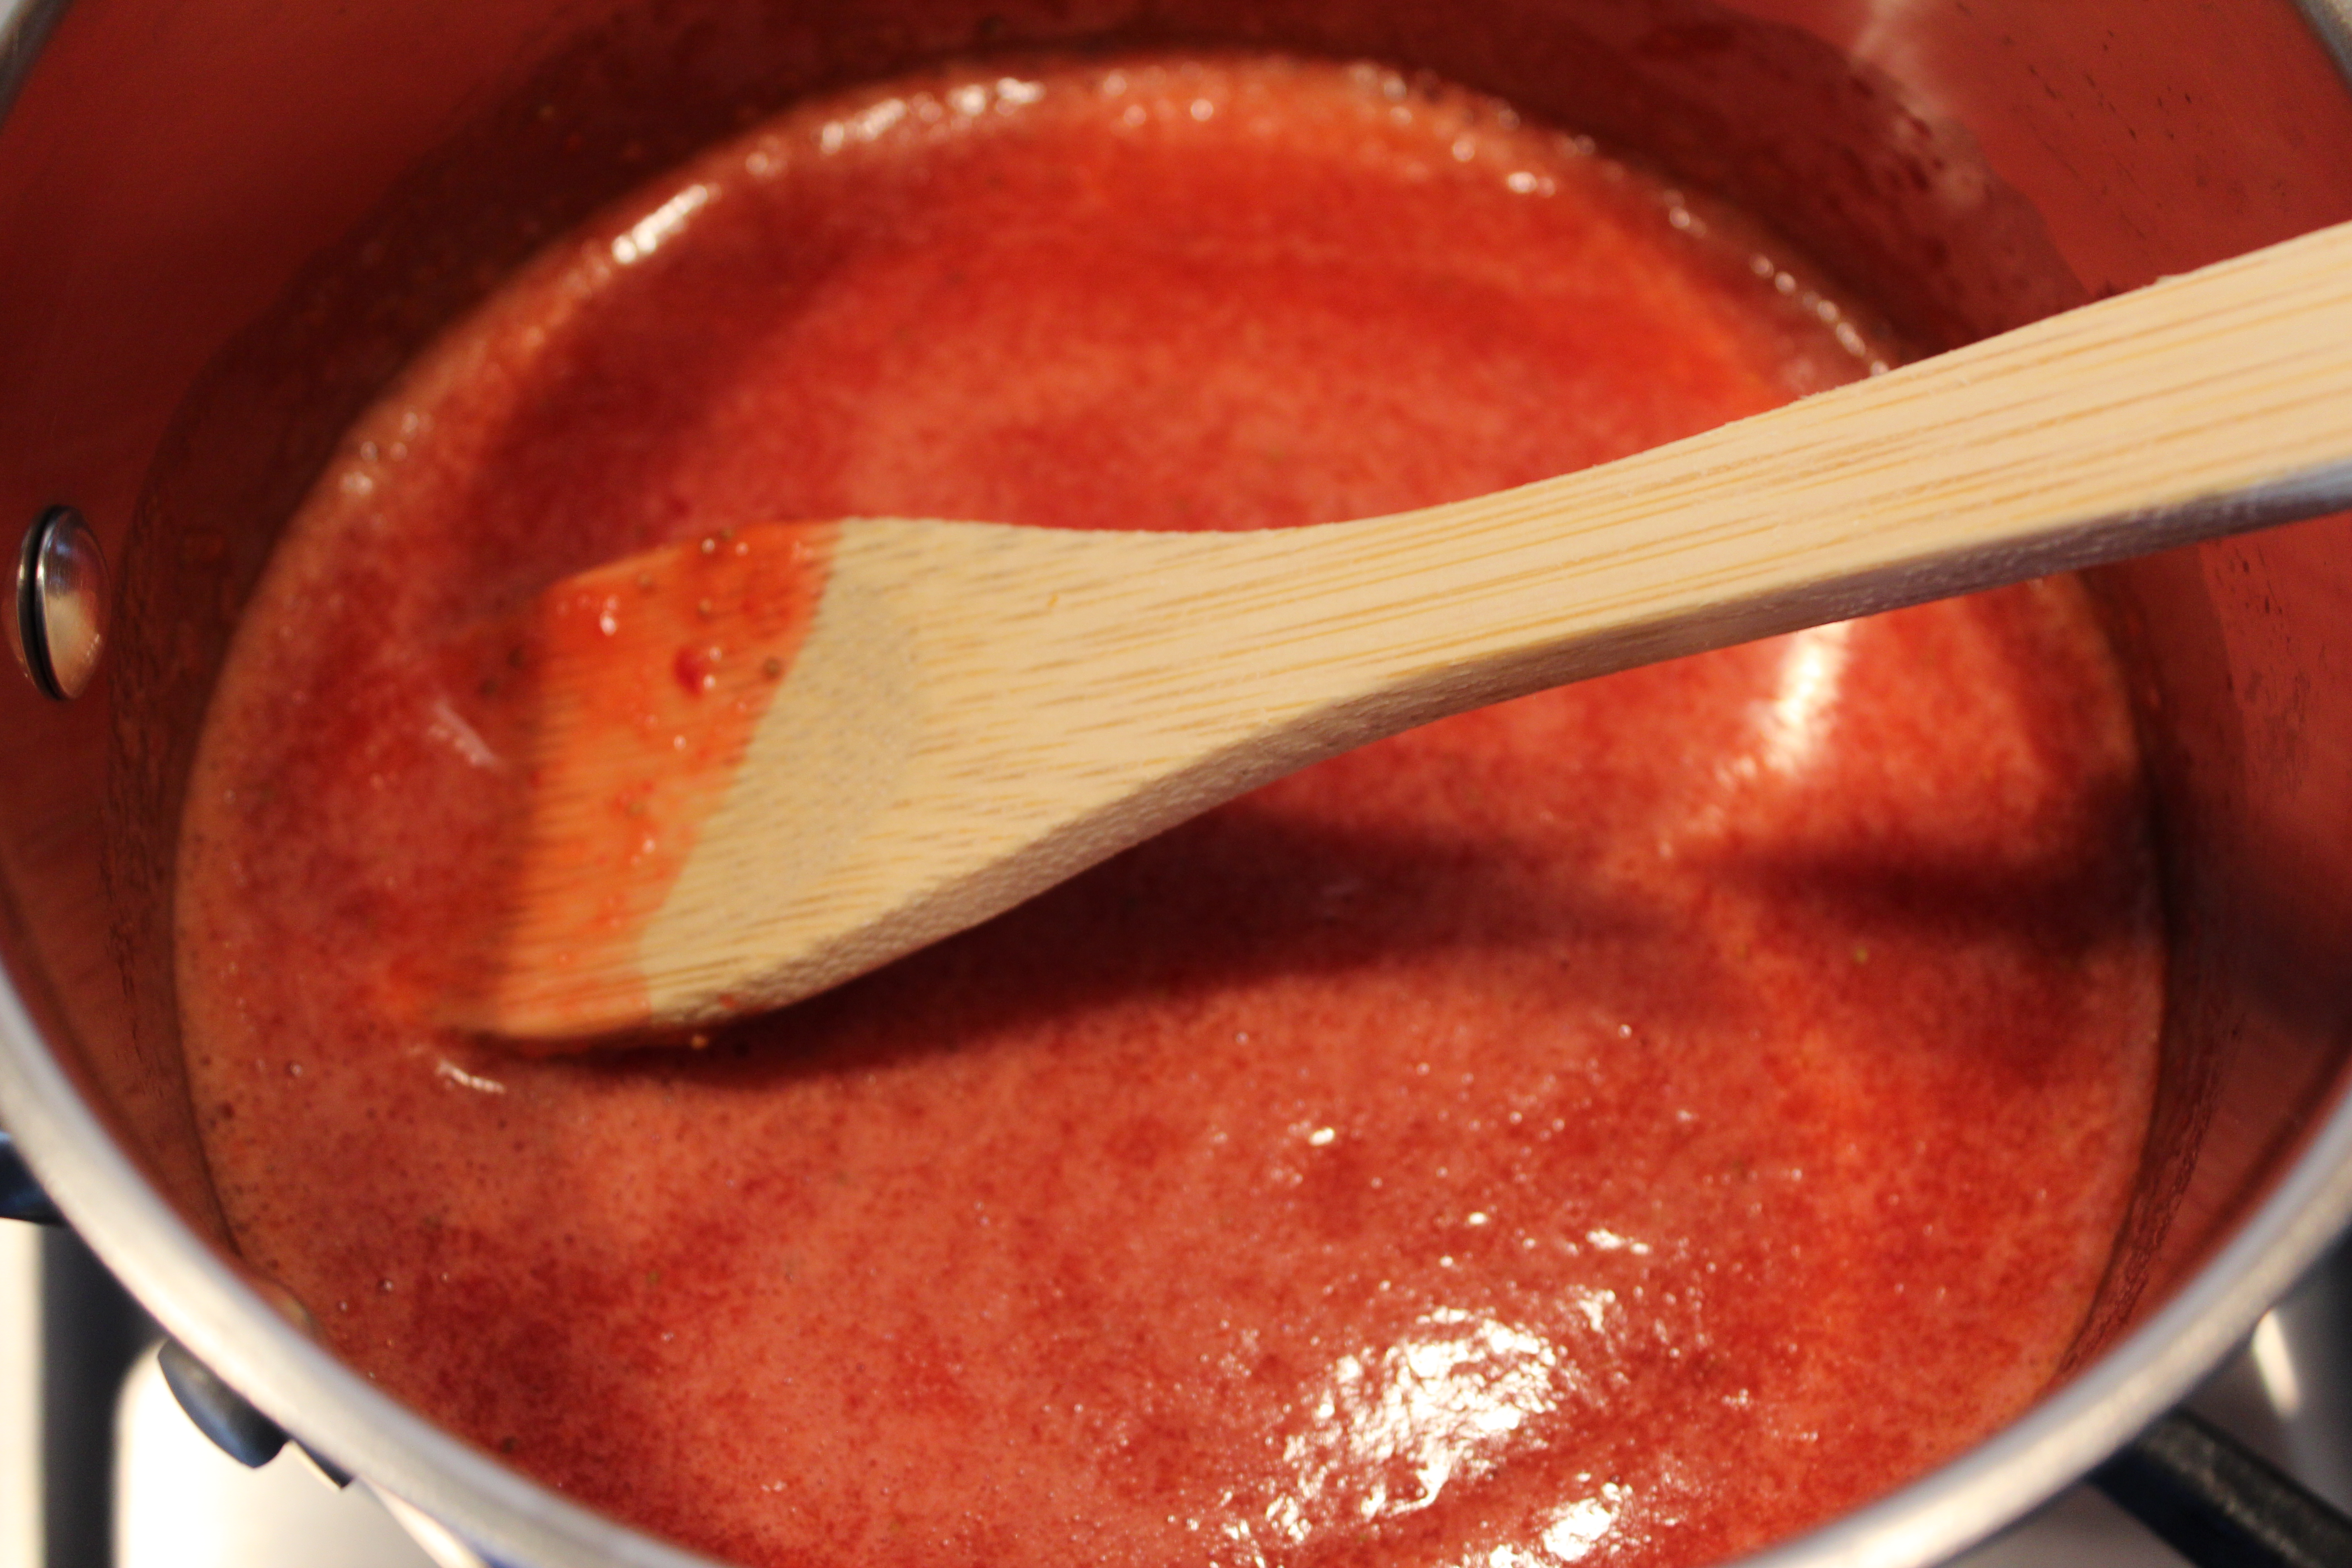
The start of cooking the strawberry mixture.  Still needs to thicken.

      IMG_4183

      The rectangular shape can be a bit misshapen.  It gives it more of a rustic, homemade look.

      Share this:

      • Tweet
      • Share on Tumblr
      • Email a link to a friend (Opens in new window) Email
      • Print (Opens in new window) Print
      Like Loading...
      Posted in Baking | Tagged Homemade Fruit Roll Ups, Strawberry Roll Ups
    • Best Ever Chocolate Frosting

      Posted at 7:00 am by Lisa Cavallari
      Feb 16th


      Chocolate Frosting Bowl

      My husband’s birthday was last Friday.  To celebrate I make him a yellow cake with chocolate frosting each year.  There is usually a glitch whenever I make the actual cake. (Which comes from a box!)  One year I didn’t mix the eggs well enough and when I cut into the cake an orange ball appeared…also known as a yolk.  That produced some laughs.  This year I was going to try and tint the cake batter blue, but 3 minutes after I popped the cake into the oven (insert explicative, I forgot to add the blue!), I pulled it out, squirted some drops of food coloring and used a toothpick to make it appear marbled.  It didn’t look that pretty and there were a lot of bubbles in the cake.  Oh well, at least he was a good sport and ate a huge piece without complaint.

      Chocolate Frosting

      This recipe dates back to my mom who learned it while growing up on the farm.  Her paperback cookbook  containing this delicious frosting recipe was a free handout at a county fair one summer.  This frosting is the perfect blend of chocolate, sugar, vanilla and light on the butter.  There’s also an ingredient that you don’t see in every frosting recipe, but I believe it makes the frosting fluffier.

      Enjoy!

      Fluffy Chocolate Cream Frosting

      • Servings: 2 1/2 cups
      • Time: 10 minutes
      • Difficulty: easy
      • Print

      Ingredients:

      6 Tbl unsalted butter at room temperature
      1/8 tsp salt
      1 tsp vanilla extract
      1 pound (4 cups) confectioner’s sugar, sifted
      2 egg whites
      3 squares Baker’s Unsweetened Chocolate, melted and cooled
      2-3 Tbl skim milk (can use whole or 2% too, whatever you have on hand)

      Directions:

      Cream together butter, salt and vanilla in a large mixing bowl. Add sugar alternately with egg whites, beat well after each addition. To melt the chocolate, I placed it in a microwave-safe dish and microwaved for 30 seconds at a time until melted. You could also melt over a double boiler over the stove. When chocolate has cooled blend into frosting. Add milk gradually until smooth and fluffy. Use immediately. There is enough to frost tops and sides of two 8-or 9 inch round cakes.


      Chocolate Frosting Close


      To create the heart in the center, use any shape cookie cutter and press slightly into frosting.  Sprinkle nonpareils inside shape and press down using a knife to ensure they don’t all roll away when you remove the cookie cutter.

      Chocolate Frosting Side

      To smooth out the frosting, dip an offset spatula or knife into warm water and spread evenly along top and sides of cake.For the frosting, I used a Wilton rosette tip inside a pastry bag.

      Chocolate Frosting Candles

      Share this:

      • Tweet
      • Share on Tumblr
      • Email a link to a friend (Opens in new window) Email
      • Print (Opens in new window) Print
      Like Loading...
      Posted in Baking | Tagged Fluffy Chocolate Cream Frosting, Fluffy Chocolate Frosting Recipe, General Foods Frosting Recipe, Old-fashioned Chocolate Frosting
    • Snickers Bars

      Posted at 7:00 am by Lisa Cavallari
      Dec 27th


      Snickers Bars

      Merry belated Christmas!  I hope you are enjoying a long, relaxing weekend after the frenzy of shopping, cooking, baking and planning.

      I was torn whether or not to post this recipe.  On one hand, the pictures looked terrific when I came across this recipe in Bon Appetit back in 2011, on the other, the amount of work it took to make them squelched any desire to attempt it.  For Christmas, I finally bit the bullet and went for it.  Not going to lie, these were a lot of work spread out over two days.  There is quite a bit of time for things to chill and set in between steps and the reaction they received from my husband and even myself was lukewarm.  They were good, but we both agreed it wasn’t worth the effort.  If you or someone you love dearly is a huge fan of Snickers then I say save this recipe for a special occasion, such as Valentine’s Day and knock yourself out.  Otherwise, don’t bother.

      I did all the leg work here so I feel the need to explain the steps for those of you that like a challenge.

      Recipe adapted slightly from Bon Appetit, September 2011 – chef Breanne Varela

      Snickers Bars

      • Servings: 12-18
      • Time: 1-2 days, depending on when you start
      • Difficulty: intermediate
      • Print

      Ingredients

      Base
      Nonstick spray
      3 1/2 oz. high quality milk chocolate (suggested ideas were Valrhona, Scharffen Berger or Lindt. I used Trader Joe’s baking chocolate)
      1 cup creamy peanut butter
      1/2 cup Rice Krispie’s cereal

      Peanut Nougat
      1 large egg white, room temperature
      1/8 tsp, plus 3/4 cup sugar
      3 Tb honey
      1 Tb light corn syrup
      1/2 cup toasted salted peanuts, chopped
      1/2 tsp kosher salt

      Milk Chocolate Bavarian Cream
      4 Tb whole milk, divided
      1 1/2 tsp unflavored gelatin
      1 cup chilled heavy cream, divided
      3 large egg yolks
      9 oz high-quality milk chocolate (see above), melted

      Chocolate Coating
      9 oz bittersweet chocolate (do not exceed 61% cacao), chopped (I used Ghiradhelli)
      2 1/2 Tb, unsalted butter

      Special Equipment: Candy Thermometer

      Directions

      Base:

      Coat an 8x8x2 baking pan with nonstick spray, line with plastic wrap or parchment paper pressing to smooth out any wrinkles. Place chocolate in a medium bowl; set over a saucepan of simmering water and stir until chocolate is melted. Stir in peanut butter, then cereal. Press over bottom of prepared pan. Cover; chill for 1 hour in fridge.

      Peanut Nougat:

      Line another 8×8 (I only had a 9×9, but made it work) with parchment and coat with nonstick spray. Place egg white in a bowl of a stand mixer fitted with a whisk attachment. Beat on medium speed until frothy. Add 1/8 tsp sugar; beat until frothy. Bring honey to a boil in a saucepan. With mixer running, gradually add honey to egg white. Set aside.

      Stir 3/4 cup sugar, corn syrup, and 3 Tb water in a small saucepan over medium heat until sugar dissolves. Attach a candy thermometer to side of pan. Increase heat; boil until mixture reaches 275 degrees, 5-7 minutes. (I burned the first batch of this mixture. Keep an eye on it or it will darken too quickly.)

      Return mixer with egg white to medium speed. Gradually add syrup to egg white, allowing it to drip down the sides of the bowl. Beat until glossy and stiff, about 5 minutes. Fold in peanuts and salt. Spread nougat over prepared pan with parchment (Not the one chilling in the fridge). Spread it in an even layer and let cool for 1 hour.

      Invert nougat over base in pan; peel off parchment. Spread over base in even layer.

      Milk Chocolate Bavarian Cream

      Place 2 Tb milk in a small bowl. Sprinkle gelatin over; let stand to soften, about 10 minutes.

      Meanwhile, bring remaining 2 Tb milk and 1/4 cup cream to a simmer in a small saucepan. Whisk yolks and sugar in medium bowl; gradually whisk in hot cream mixture. Return to same pan. Stir over medium-low heat until thickened and a thermometer registers 175 degrees, about 3 minutes. Add gelatin; whisk until dissolved.

      Place melted chocolate in another medium bowl. Pour cream mixture through a strainer into chocolate; whisk until smooth.

      Beat remaining 3/4 cup chilled cream in a small bowl until soft peaks form. Fold into chocolate mixture in 2 additions. Pour Bavarian cream over nougat, spreading in an even layer. Freeze until firm, about 4 hours.

      Chocolate Coating

      Place chocolate and butter in a bowl set over medium saucepan of simmering water. Stir until melted.

      Line a baking sheet with parchment paper. Invert 8″ pan on a work surface; remove pan and peel off plastic/parchment. Cut into 6 slices and halve each slice. We halved them again because these bars are extremely rich. Using an offset spatula spread chocolate over top. Freeze to set, 30 minutes.

      Do ahead

      You can make these 3 days in advance and keep frozen until ready to eat. Let stand at room temperature for 15 minutes before serving.


      Looking back on this recipe I am wondering what the hell I was thinking! This is insane; especially trying it in the month of December! Oh well. I like to go big for special occasions and I learned a lot. My first time making Bavarian Cream and it was a success.

      Snickers Bars

      Here’s what you DON’T want your nougat base to look like when boiling your sugar.  Too dark.

      IMG_4078

      The result, when you do it correctly, is a fluffy, light mixture.

      IMG_4079

      Spreading out the nougat.

      IMG_4083


      The bars before you add the final chocolate layer.

      IMG_4084

      You know you want to try a bite.

      IMG_4088


      Share this:

      • Tweet
      • Share on Tumblr
      • Email a link to a friend (Opens in new window) Email
      • Print (Opens in new window) Print
      Like Loading...
      Posted in Baking | Tagged Snickers Bars
    • Pumpkin Pecan Granola

      Posted at 8:00 am by Lisa Cavallari
      Dec 20th

      Pumpkin Pecan Granola

      Ahhh!  Christmas is just a few days away and that means only one thing…panic!  Oh, and bake.  Even if you are limping to the finish as I probably will be doing, you may have time (after Christmas) to try this recipe over winter break.  It’s a nice way to mix in some healthy food along with all of the other tempting and delicious options out there.  The spices also really add to the flavors of the season.

      Recipe adapted from Cooking Classy

      Pumpkin Pecan Granola

      • Servings: 8-10
      • Time: 1hr
      • Difficulty: easy
      • Print

      Ingredients:

      3 1/2 cups old fashioned oats
      6 Tbl flaxseed meal
      3/4 cup chopped pecans
      1 cup canned pumpkin puree
      2/3 cup packed light-brown sugar
      1/4 cup canola oil
      1 tsp vanilla extract
      1/2 tsp salt
      1 1/2 tsp ground cinnamon
      3/4 tsp ground ginger
      1/4 tsp ground nutmeg
      1/4 tsp ground allspice
      1/8 tsp ground cloves
      1/2 cup raw pumpkin seeds
      2/3 cup dried cranberries

      Directions:

      1. Preheat oven to 300 degrees. Toss together oats, flaxseed meal and pecans in a large bowl.

      2. Tear off 3-4 sheets of paper towels and lay on clean surface. Scoop pumpkin puree onto towels to absorb some of the moisture. Blot the top and sides of the puree as well.

      3. In a separate bowl, combine the pumpkin puree, brown sugar, honey, canola oil, vanilla, salt, cinnamon, ginger, nutmeg, allspice and cloves until combined. Pour over oat mixture. Toss with a rubber spatula until mixture is evenly coated.

      4. Spread mixture onto a baking sheet into an even layer. Bake in oven and toss mixture every 15 minutes to ensure mixture does not stick together and bakes evenly. After a total of 45 minutes, add the pumpkin seeds and bake another 10 minutes. If more crunch is desired add 5-10 minutes more to the final cooking time. Toss in dried cranberries, allow to cool completely and store in an airtight container.

      Pumpkin Pecan Granola

      Thanks to G for the inspiration on this one.  I was munching on the granola you gave us last year for Christmas well into the good part of January.


      Share this:

      • Tweet
      • Share on Tumblr
      • Email a link to a friend (Opens in new window) Email
      • Print (Opens in new window) Print
      Like Loading...
      Posted in Baking, Holidays | Tagged Pumkin Granola, Pumpkin Pecan Granola, Spiced Granola
    ← Older posts
    Newer posts →
    • Recent Posts

      • Know The Signs
      • Popovers
      • Wine On Wednesday: Pride
      • Chicken Piccata
      • Skillet Chocolate Chip Cookie
    • Categories

      • Wine (47)
      • Baking (41)
      • Cooking (31)
      • Holidays (16)
      • Kids (16)
      • Shopping (10)
      • diy (10)
      • Uncategorized (8)
      • Travel (7)
      • Health (5)

Start a Blog at WordPress.com.

  • Subscribe Subscribed
    • Home Is Where The Haggis Is
    • Join 82 other subscribers
    • Already have a WordPress.com account? Log in now.
    • Home Is Where The Haggis Is
    • Subscribe Subscribed
    • Sign up
    • Log in
    • Report this content
    • View site in Reader
    • Manage subscriptions
    • Collapse this bar
 

Loading Comments...
 

    %d