Home Is Where The Haggis Is

  • Home
  • About
  • Archives
  • Category: Cooking

    • Gnocchi Made Simple

      Posted at 8:00 am by Lisa Cavallari
      Nov 18th

      Gnocchi

      This recipe comes straight from Grandma Cavallari’s kitchen.  She pronounces it “yon-key” and it was one of the first recipes I learned to make from her.  Although I experienced a couple of hiccups after my first lesson due to lack of flour (you can never use too much in this recipe), it really has proven to be an easy and tasty way to enjoy homemade pasta.  I think my jaw hit the floor, and my husband too, when she showed us her secret tomato sauce…Prego Traditional Pasta Sauce.  Grandma swore that it tasted almost as good as the homemade version that she made, but this took a lot less time so we only use Prego now.

      Oh, and can I also mention how inexpensive this recipe is too?   Give it a try this winter and let me know how it worked for you.

      Homemade Gnocchi

      • Servings: 6-8
      • Time: 1hr15mins
      • Difficulty: moderate
      • Print

      Ingredients:

      • 4 large Russet potatoes (factor 1/2 potato per person)
      • 1/2 bag of Gold Medal All-Purpose Flour
      • 1 large jar Prego Traditional Pasta Sauce

      Tools:

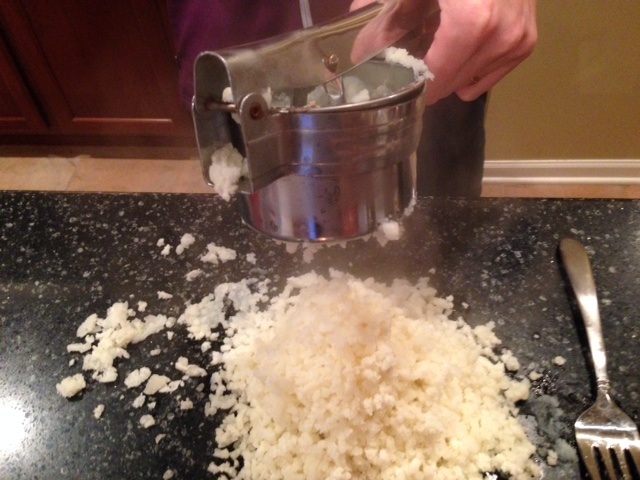
      Potato Ricer – a stainless steel kitchen tool that presses potatoes through a sheet of small holes leaving them light and fluffy without mashing.

      Directions

      1. Bring a large pot of salted water to a boil.  Peel potatoes and place them carefully into pot of boiling water.

      2. Allow potatoes to cook until tender when pierced with a fork, roughly 15-20 minutes.  Take potatoes out of pot by  placing them into a bowl.  Drain pot and refill with fresh water.  Add salt and bring water back to a boil.

      3. Place pot near your work surface, preferably a clean countertop.  Place half of a potato into ricer and press down so that potato pieces fall into a mountain-like pile.  Continue to press remaining potatoes through ricer.

      4. Working quickly while the potatoes are still hot, place a pile of flour equal to the pile of potatoes next to one another.  Combine potatoes and flour until you have formed a nice dough into a ball.  Be careful working with the hot potatoes. The mixture must be hot or it will not be the consistency you want it.

      5. Sprinkle flour on your work surface and roll out your dough with a rolling pin.

      6. Using a knife cut strips about 1/2 inch to an inch wide.

      7. Using more flour, roll each strip into a rope shape.

      8.  Cut each strip on the diagonal into 1 inch pieces.

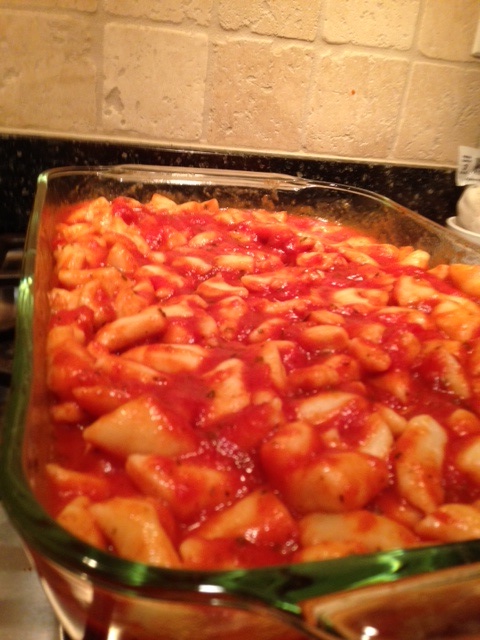
      9.  Once pieces are cut, place them into the remaining pot of water.  Stir constantly.  They don’t take long to cook and once they begin to float, you know they are fully cooked.  Drain pasta and place in a large, rectangular dish.  Pour Prego on top as well as grated Parmesan cheese.  Bake in the oven at 350 degrees until cheese is melted, about 10 minutes.

      Enjoy!

      Using the ricer.  See the steam?  I wasn’t kidding when I said it’s hot!

      Ricer

      Cutting pieces of potato pasta.   They look like cute, little pillows. Tip: we accidentally used bread flour instead of all-purpose (long story) and it made the pasta more al dente.  I would try that mistake again.

      Gnocchi


      Cutting Gnocchi

      Share this:

      • Tweet
      • Share on Tumblr
      • Email a link to a friend (Opens in new window) Email
      • Print (Opens in new window) Print
      Like Loading...
      Posted in Cooking | Tagged Homemade Gnocchi, Potato Dumplings, Potato Gnocchi
    • Home Is Where The Haggis Is Turns 1! Plus, A Giveaway…

      Posted at 10:00 am by Lisa Cavallari
      Oct 23rd

      IMG_3936

      One year ago this blog began.  It’s been quite a journey.  From recipes to family activities, you guys have followed along.  I am sorry to write that I will no longer be continuing to post in the future.  Ha!  Did I fool you?  Sorry about that, but I had to make sure you were actually reading this and to let you know that in order to make this fun for all please tell your friends, family and co-workers about these posts.  I need more followers, more comments and feedback in order to keep improving.  If you haven’t already, sign up to follow my blog via email. It will ensure that you never miss a post. Thank you for the support.  I truly appreciate it.

      Okay, so I’m trying to incorporate more leafy greens and veggies for the family and when the 5:00 frazzles hit our household last night I decided to whip up a basic and extremely versatile vinaigrette to toss with some salad greens that are about to get slimy if they continue to sit in the fridge for even one more day.

      I used Galena Garlic Company aged balsamic vinegar in this recipe.  Since there are very few ingredients it is important to use the best quality for the balsamic and olive oil.  Doing this, makes the flavors pop and turns any basic, boring salad into a masterpiece.  One lucky winner will receive a bottle of this dark, tangy, sweet balsamic vinegar when you add a comment indicating your favorite blog post from Home Is Where The Haggis Is.  This balsamic is aged 18 years and the owner brings loads of it over from Modena Italy.  In the store, you can sample the vinegars and olive oils straight from a small, plastic cup and man are they are smooth!

      IMG_3930

      Here’s the recipe.

      Balsamic Vinaigrette

      • Servings: 6
      • Time: 10mins
      • Difficulty: easy
      • Print

      adapted slightly from Emeril

      Ingredients:

      • 1/4 cup balsamic vinegar
      • 2 tsp brown sugar
      • 1 Tb chopped garlic
      • 1/2 tsp salt
      • 1/2 tsp ground black pepper
      • 3/4 cup olive oil
      • Salad greens

      Directions

      Combine all ingredients minus the salad greens in a medium-sized bowl using a whisk.  (Or cheat and use an old vinaigrette container to shake it all up)  Toss salad dressing with greens just before serving.

      IMG_3926


      Here’s my attempt to please the younger taste buds around here.  I have to be honest (I swear this blog is like my confessional) they didn’t go for it.  They just ate the fruit around it and picked at the shavings of Parmesan.  Oh well, more for me!

      Balsamic Vinaigrette salad

      Share this:

      • Tweet
      • Share on Tumblr
      • Email a link to a friend (Opens in new window) Email
      • Print (Opens in new window) Print
      Like Loading...
      Posted in Cooking | Tagged Balsamic Vinaigrette
    • Preserving Summer

      Posted at 9:00 am by Lisa Cavallari
      Sep 1st

      Canning Pickles

      Labor Day Weekend is always bittersweet.  I look forward to cozy sweaters, vibrant colored trees dotting the landscape and my favorite of all holidays…Halloween!  BUT, I will miss being able to slip on sandals effortlessly and enjoy days at the pool and park.

      This post is like Canning 101 for anyone who has never attempted the canning process before.  It is really not that complicated and when you hear the popping sound when the first jar sealed you will be hooked.  I took a class last summer that went over the basics like pickling cucumbers, making raspberry jam and a wonderful peach chutney so I am passing some of what I learned along to you.

      A few tools you will need :

      A plastic funnel

      Rubber tongs to submerge and remove the jars from the water bath

      Mason jars, lids and screw caps

      A large stockpot

      (I bought these items at Ace Hardware.  They are usually on sale this time of year.)

      Bread and Butter Pickles

      Makes 5 pint jars

      Ingredients

      8 cups sliced pickling cucumbers

      1 onion thinly sliced

      2 Tbs kosher salt

      2 cups cracked ice

      2 1/2 cups cider vinegar

      2 1/4 cups granulated sugar

      1/2 tsp turmeric

      1 tsp celery seeds

      1 Tbs mustard seeds

      1/8 tsp red chili flakes

      1/2 tsp black peppercorns

      3 bay leaves, crushed


      Directions:

      1.  Start by chopping your onions and pickling cucumbers and toss them into a bowl.

      2.  Add your salt and ice into the bowl and mix well.  Place another bowl with water or a heavy can on top and allow to sit at room temperature for 3 hours.

      3.  While the cucumbers and onions marinate, you can wash and sterilize your jars and lids.  I place the jars on a sheet pan and put them in a 225 degree oven for a half hour.  Note: the jars must be hot when you add the brine mixture or else they can crack.

      4.  To make the brine, combine the vinegar, sugar, turmeric, celery and mustard seeds in a large pot and bring to a boil.  Put a large separate pot on to boil with 6 inches of water.

      5.  Drain the cucumbers and onions and add them to the brine.  Bring it back to a full boil and immediately turn off the heat.

      6.  Evenly distribute the chili flakes, peppercorns and bay leaves between the jars.

      7.  Place the cucumbers and onions into the jars, packing them down tightly.  Fill the jars with the brine, leaving 1/2 inch of headroom.  Use a chopstick or knife to take out any air bubbles.

      8.  Wipe the rim and place the lid on the hot jar.  Carefully set the jars in the pot of hot water using the rubber tongs.  Cover and bring to a boil and process for 10 minutes.

      9.  Remove jars carefully from the water bath.  Place them on a wire rack to cool.  Make sure the jars seal properly.  You will hear the popping sound when that happens.  If they have not sealed, you can always place the pickles in the refrigerator and enjoy immediately.  For the ones that seal, place them in a cool, dry place and away from light.  Give them as gits this holiday season!

      Wait one week to enjoy your pickles.


      Pickling Cucumbers

      Pickling Cucumbers

      Sterilizing Jars

      IMG_2651

      IMG_2661


      And the winner is…..

      Congratulations to Carrie for winning the NFL football!  Stay tuned for more giveaways.

      Share this:

      • Tweet
      • Share on Tumblr
      • Email a link to a friend (Opens in new window) Email
      • Print (Opens in new window) Print
      Like Loading...
      Posted in Cooking | Tagged Bread and Butter Pickles, Canning, Pickling
    • Perfect Pesto

      Posted at 10:00 am by Lisa Cavallari
      Jul 16th


      Pesto

      Here is summer in a jar folks.  It is packed with garlic and basil and the vibrant green color just makes me happy-not just because that happens to be my favorite color.  Mix up a batch and toss with pasta, spread on a sandwich or grab some crusty bread and dip right into it.  We buy our bread from Costco.  It’s their French Baguette that comes in a pack of 2 for $4.99.  (The pesto can also be shared among friends and neighbors.  You know who you are.) Pair it with a crisp white wine.

      Pesto

      Ingredients

      3 cloves of garlic

      3 cups packed basil

      1/4 cup pine nuts

      1 and 1/2 cups olive oil

      1 tsp salt and pepper

      1/2 cup grated Parmesan cheese

      Directions

      Place all ingredients into a blender and blend on high until completely combined.  Store in an airtight container up to a week in the refrigerator.


      Pesto

      Share this:

      • Tweet
      • Share on Tumblr
      • Email a link to a friend (Opens in new window) Email
      • Print (Opens in new window) Print
      Like Loading...
      Posted in Cooking | Tagged Basil, Garlic, Olive oil, Pesto
    ← Older posts
    Newer posts →
    • Recent Posts

      • Know The Signs
      • Popovers
      • Wine On Wednesday: Pride
      • Chicken Piccata
      • Skillet Chocolate Chip Cookie
    • Categories

      • Wine (47)
      • Baking (41)
      • Cooking (31)
      • Holidays (16)
      • Kids (16)
      • Shopping (10)
      • diy (10)
      • Uncategorized (8)
      • Travel (7)
      • Health (5)

Start a Blog at WordPress.com.

  • Subscribe Subscribed
    • Home Is Where The Haggis Is
    • Join 82 other subscribers
    • Already have a WordPress.com account? Log in now.
    • Home Is Where The Haggis Is
    • Subscribe Subscribed
    • Sign up
    • Log in
    • Report this content
    • View site in Reader
    • Manage subscriptions
    • Collapse this bar
 

Loading Comments...
 

    %d