Home Is Where The Haggis Is

  • Home
  • About
  • Archives
  • Category: diy

    • DIY Coconut Bowls

      Posted at 7:00 am by Lisa Cavallari
      Jun 12th

      Coconut Bowl

      If you’re looking for a fun do-it-yourself project to tackle this summer with the kids, then give this one a try,  coconut bowls.  For this you need: a coconut, a hammer, fine grain sandpaper and a sealant such as Mod Podge.

      You can find a coconut at your local supermarket.  One coconut will make one bowl.  Some of them are pre-scored to make it easier to crack the shell.  

      Cracking The Nut

      My girls were fascinated as they watched my husband carefully chisel the top off the coconut.  They were also eager to catch any of the milk that poured out, but of course made a face when they tried it.  I am not a fan, myself.  It is pretty bitter.  Must be an acquired taste.  Oh, and the shirt my husband is wearing might have been the result of a subtle suggestion.  So cheesy, I know, but hey, that’s me.  

      Coconut Bowls

      Scoring the shells with the knife and scraping with a spoon worked best.

      The girls tried to help scrape the coconut flesh out the shell.  This part takes some muscle and patience.  I used a knife and a spoon to scoop out the coconut.  (The girls just stuck with a spoon.) Then I let them dry overnight.

      The next day you can sand them both on the outside and inside until it is smooth.  

      Lastly, add 3-4 coats of sealant on the inside of the shell.  If you plan to serve food such as nuts or other food, you can use a food-safe sealant.  I just used Mod Podge with a glossy finish.  It is water-based and non-toxic so the girls had fun painting a few coats themselves.  

      Coconut Bowl

      Aren’t they cute?  It’s an inexpensive way to add a tropical touch to your decor when you’re entertaining this summer.  You could even transform your bowl into a homemade candle.  That would make a great hostess gift.

      Organize Your Space Using Coconut Bowls

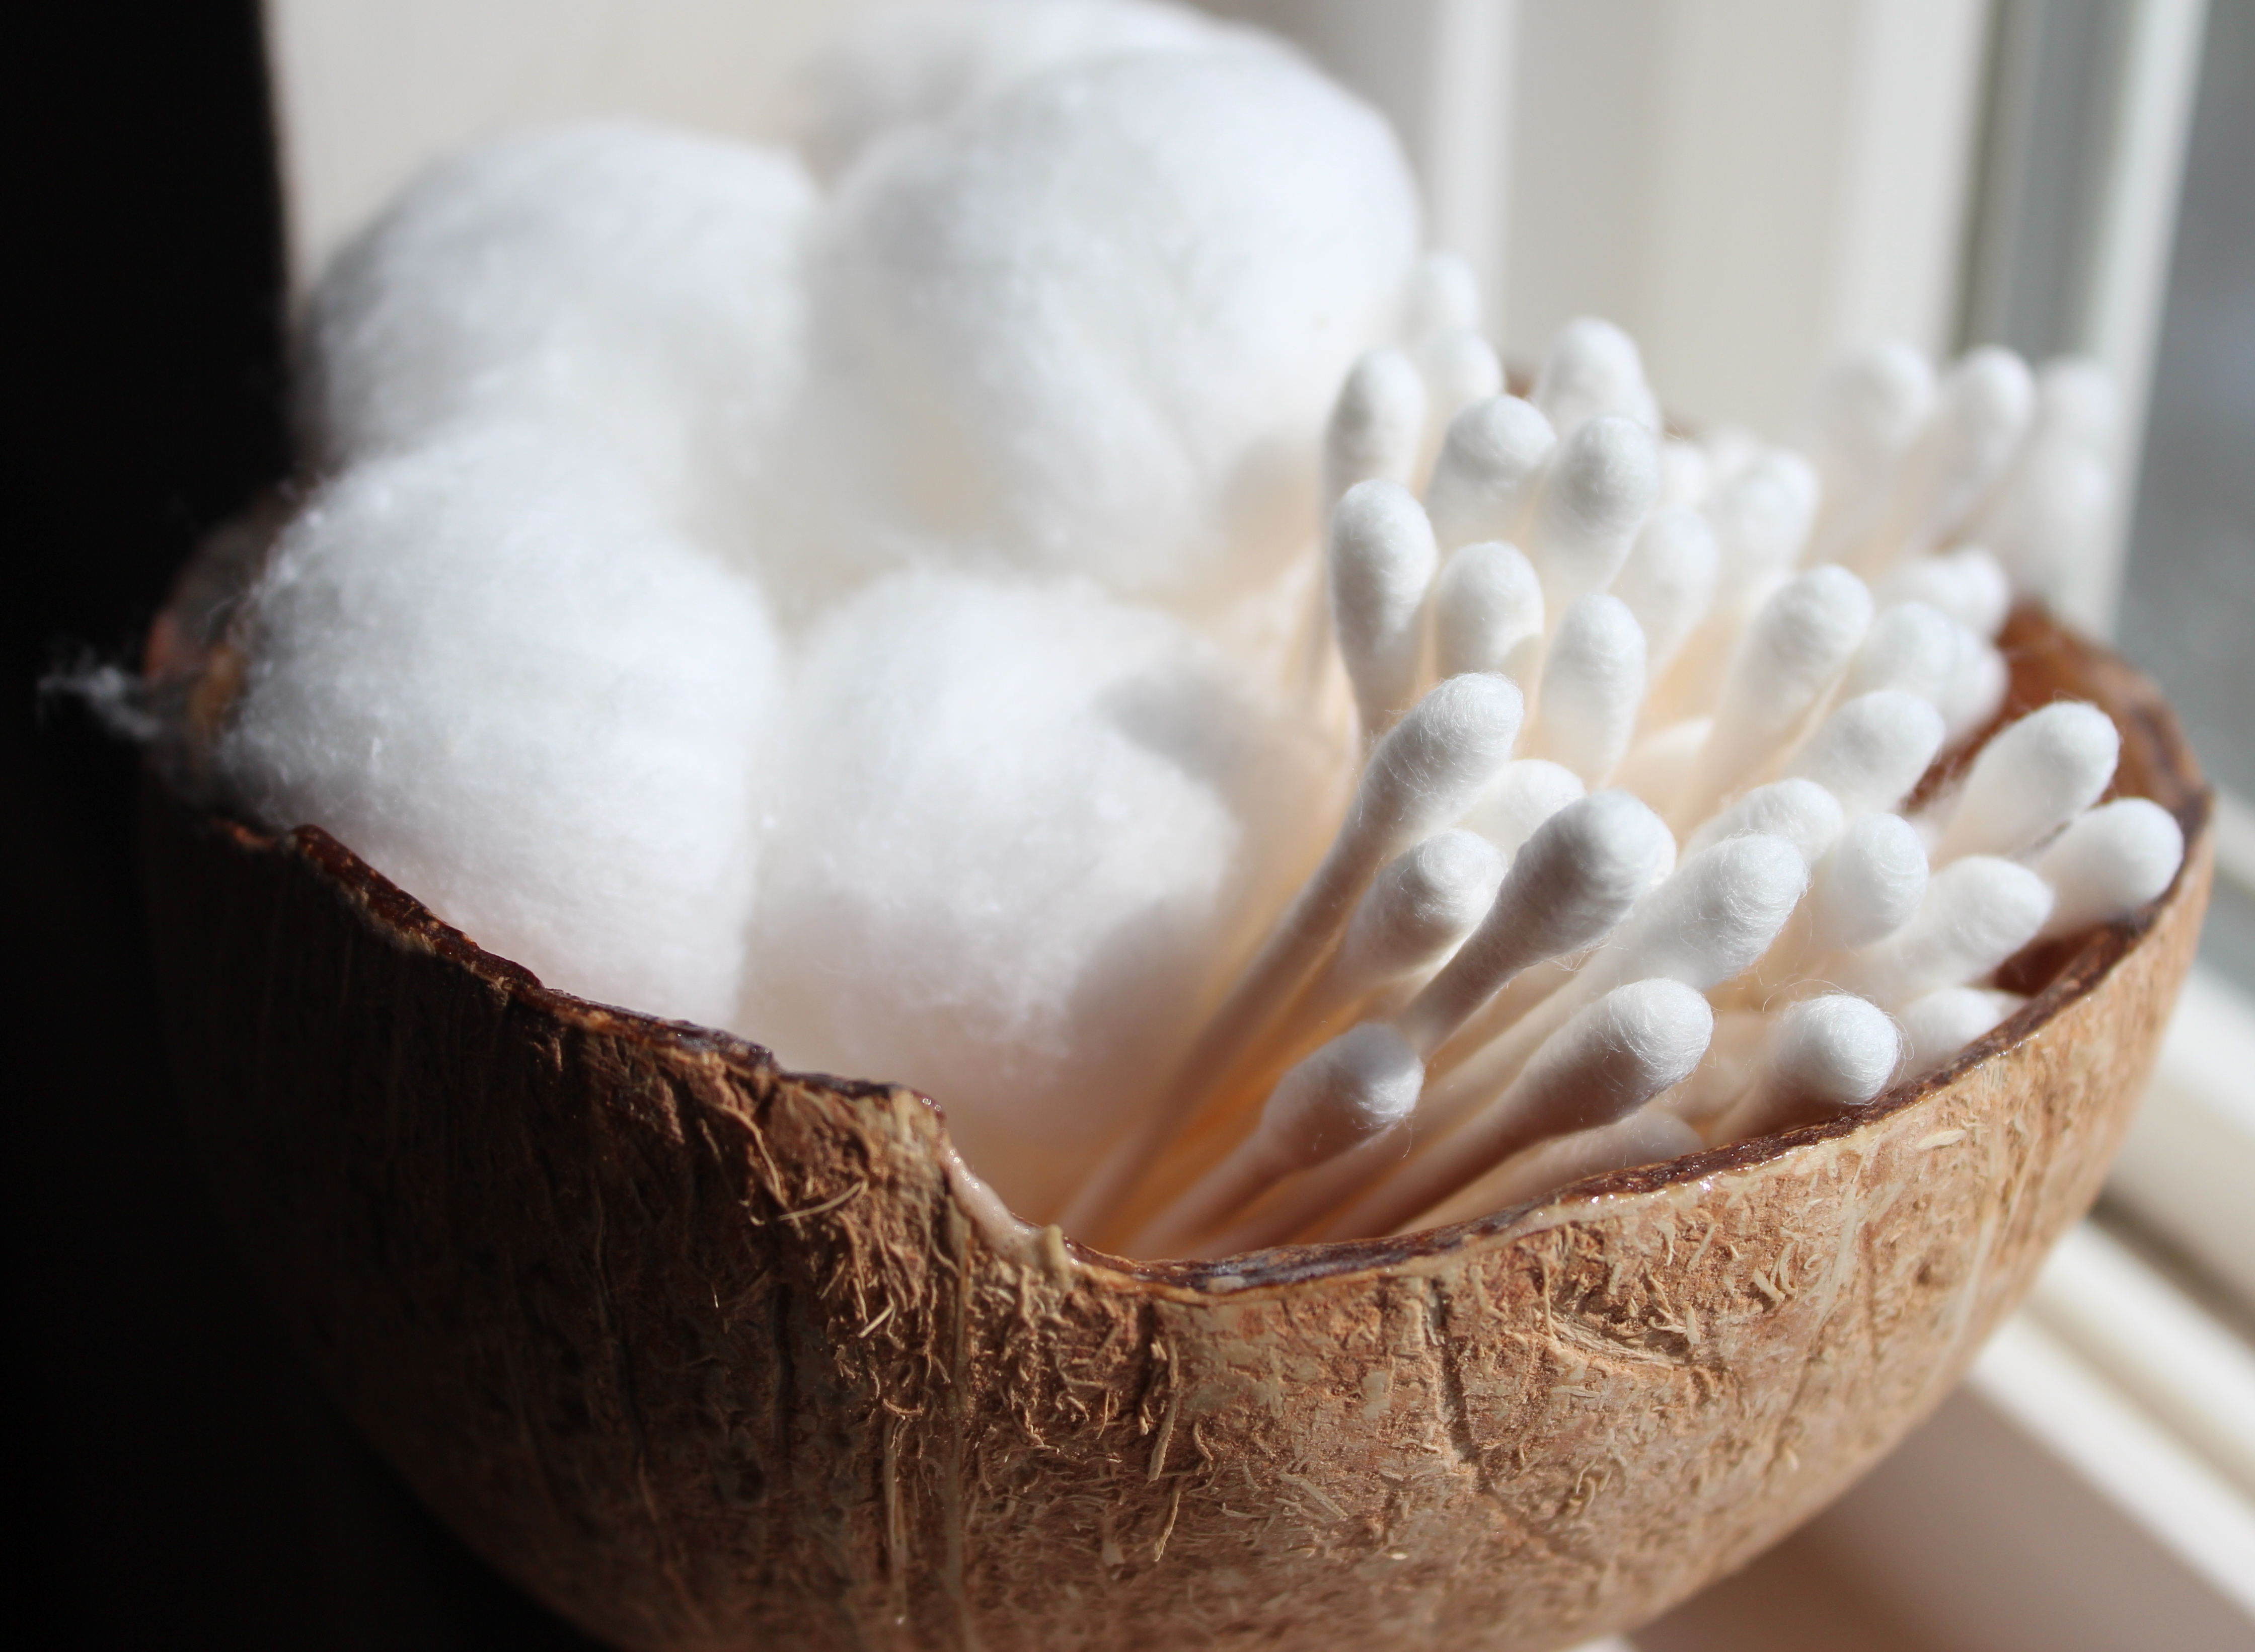
      Or organize your bathroom by adding cotton balls, Q-tips, hair ties, whatever you want.


      Credit goes to Sugar And Charm for this creative idea!


      Share this:

      • Tweet
      • Share on Tumblr
      • Click to email a link to a friend (Opens in new window) Email
      • Click to print (Opens in new window) Print
      Like Loading...
      Posted in diy | Tagged Coconut Bowls
    • Green Thumbs Need Not Apply

      Posted at 7:00 am by Lisa Cavallari
      Jan 12th

      IMG_4147

      To bring a little life indoors, we created some terrariums this weekend.  After doing some research and scouring the house for items we already had, the girls and I were ready to start.  I decided to go with planting a cactus and a succulent as they are low maintenance and require watering about every 2 weeks.  If you decide to plant moss and ferns, you never need to water your plants, but you will need a terrarium with a lid as well as charcoal to prevent mold.

      Here are the directions to make your own terrarium.

      Checklist:

      • a glass container
      • river rocks
      • sand
      • cacti or succulents
      • decorative rocks, shells or quirky items to decorate your terrarium

      Steps:

      1. Begin with finding a glass container.  This could be a Mason jar, a fish bowl, a wide vase or check your local IKEA or pet store for inexpensive glass containers.  Make sure your plants can fit easily inside of it.

      2.  Add a layer of river rock.  Enough to cover the bottom.  Supervision of the kids is recommended to ensure they carefully place the stones in the bottom or the glass could chip or break.

      3. Use some sand to cover the stones.  We had plenty of sand left over from Sydney’s art party so the girls had lots of fun picking which color sand they wanted to layer first, second, etc.

      4. Once you have a flat base in which to place your plant, set it right in the glass with its original planting container.  Carefully add more sand around the sides of the container to secure the plant.  Try not to let any sand cover your plant.

      5. Add finishing decorative touches.  We used pink seashells, blue stones and some large rocks.

      IMG_4152

      IMG_4153

      Share this:

      • Tweet
      • Share on Tumblr
      • Click to email a link to a friend (Opens in new window) Email
      • Click to print (Opens in new window) Print
      Like Loading...
      Posted in diy, Kids | Tagged Succulent Terrarium, Terrarium DIY
    • Fall Fever

      Posted at 9:00 am by Lisa Cavallari
      Sep 10th

      IMG_3871

      Autumn is practically here.  The chill is supposed to set in slightly this week in Chicagoland and the temperature has turned noticeably cooler in the evenings.  I am hoping to get one more batch of pesto out of my basil before it turns completely brown.

      Inspiration struck over the weekend to take out some of my fall decorations when I saw that a friend had put hers out.  Thank you for the motivation, Debbie.  😉  Except this year, I wanted to show some more restraint.  In the past, I have admittedly gotten carried away with my fall decorating.  It looked like a Halloween store/leaf storm blew through the house.  Part of it is for the kids and the outdoor decorations will still be out in full force, but some rooms I plan to keep Halloween-free because, let’s face it, it’s not relaxing decor, is it?  A skull blinking on and off or a witch staring at you while you eat dinner.  It can be a little unsettling for guests.

      IMG_3882

      I saw a butcher block decorated for fall on Pinterest and decided to recreate the look.  The only thing I am missing is a basket below and a copper bowl or pitcher with some gourds.

      IMG_3873

      Here is our mantle.  I am not entirely happy with the duck decoy in the middle, but I will keep playing around with it.

      IMG_3874

      A close-up of the bittersweet I bought from Pottery Barn many moons ago.  I love bittersweet.

      IMG_3872

      A few children’s classics that belonged to my dad when he was growing up and an NFL Throwback helmet.  Voila.  Subtle fall touches.

      What do you like to put out when the seasons change?  Get the house cozy now because it sounds like this winter is going to be a doozy!


      Share this:

      • Tweet
      • Share on Tumblr
      • Click to email a link to a friend (Opens in new window) Email
      • Click to print (Opens in new window) Print
      Like Loading...
      Posted in diy | Tagged Fall Decorating, Fall Decorating Ideas, Fall Mantle
    • Fabulous Fireplace

      Posted at 9:00 am by Lisa Cavallari
      Jul 10th


      IMG_3734

      This post has been a long time coming and I am excited to share it with you.  Sometime back in January I happened upon a very cool idea for your fireplace when it’s not in use.  Pepper Design Blog had posted an interesting solution to recreate the look of faux stacked wood for her fireplace so I followed her instructions and gave it a shot.

      IMG_3373

      Let’s start off with the materials you will need.  A piece of plywood cut to fit the opening of your fireplace, chalkboard paint, lots of birch or any wood you care to use and wood glue.

      IMG_3370

      I had my husband measure and cut out the plywood for me.  He made sure the wood fit snugly into the opening before I began painting.

      The wood only needed one coat of paint and the chalkboard kind gives it a flat look instead of going glossy.  The idea is to give the effect of depth.

      Next I had my father-in-law and husband cut 3-inch pieces of birch for me.  This is the hard part because it takes a lot more wood than you would expect.  I thought I would have plenty with 13 large logs, but I needed waaay more than that, more like 4 times that many.

      My dad is the supplier of the birch.  He brings it home from his fishing trips in northern Minnesota and my mom will stock up her car when she drives out to visit me and the girls.  🙂  Aw, such a lucky daughter to have these kind of parents.  I am sharing this post in the summer because wood is much easier to get now then, oh, I don’t know the dead of winter when I decided this would be a great project to take on and there was no wood in sight.  I wasn’t kidding when I said this project took me a while.  I got my second round of birch in June and got back on track with this DIY job.

      Finish cutting the 3-inch pieces.  Hint: I went to Home Depot and they cut the rest of the logs for me at no cost.  Yay!  This was shaping up to be a very budget-friendly project indeed.

      The saw left behind some rough edges so I used a sander to smooth them down a bit.  The logs are not all perfectly smooth, but it gives them a more rustic look.  Or whatever I want to tell myself.  ; )

      The final step was arranging the log pieces the way I wanted on the plywood and gluing each piece down.  I used Gorilla Glue and loved the results.  At some point I might reinforce the bottom and side logs with a nail gun, but I don’t have access to one at the moment.

      Here is the completed project.

      IMG_3726 IMG_3727

      What do you think?  Ready to take this on too?


      Share this:

      • Tweet
      • Share on Tumblr
      • Click to email a link to a friend (Opens in new window) Email
      • Click to print (Opens in new window) Print
      Like Loading...
      Posted in diy | Tagged Faux Fireplace Insert, Faux Stacked Logs, Fireplace Insert, Stacked Birch Logs
    ← Older posts
    Newer posts →
    • Recent Posts

      • Know The Signs
      • Popovers
      • Wine On Wednesday: Pride
      • Chicken Piccata
      • Skillet Chocolate Chip Cookie
    • Categories

      • Wine (47)
      • Baking (41)
      • Cooking (31)
      • Holidays (16)
      • Kids (16)
      • Shopping (10)
      • diy (10)
      • Uncategorized (8)
      • Travel (7)
      • Health (5)

Start a Blog at WordPress.com.

  • Subscribe Subscribed
    • Home Is Where The Haggis Is
    • Join 82 other subscribers
    • Already have a WordPress.com account? Log in now.
    • Home Is Where The Haggis Is
    • Subscribe Subscribed
    • Sign up
    • Log in
    • Report this content
    • View site in Reader
    • Manage subscriptions
    • Collapse this bar
 

Loading Comments...
 

    %d